


1. New photography tutorials and tips
2. Latest photography assignments
3. Photo competitions and prizes
Enter your email below to subscribe.
 Shutter Speed is one the three pillars of photography (among Aperture, Shutter and ISO), which controls the amount of exposure or light in the image. Shutter primarily controls the exposure time, i.e. the time for which the image sensor is exposed to the incoming light.
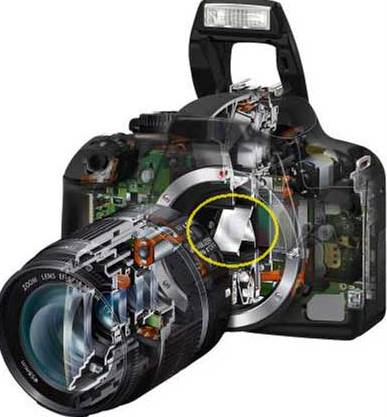
Refer to the yellow circle in the image of the camera above. This is the mirror, which is in between the light coming from the lens and the sensor (which is behind it). When we press the button to click the image, this mirror goes up and come back to the original position. The light entering through the lens falls on the sensor for the duration when the mirror is up. This flipping system is called shutter and the speed at which it flips is called the shutter speed. However, this system is different in some of the latest technologies such as Single Lens Translucent (SLT) and Mirrorless cameras. But, we will keep our discussion focused to not digital or D-SLR cameras, in which we have option to change or control the shutter speed (general using Tv or S modes).
The decision of shutter speed is based on the situation and the subject. Here are three general situations:
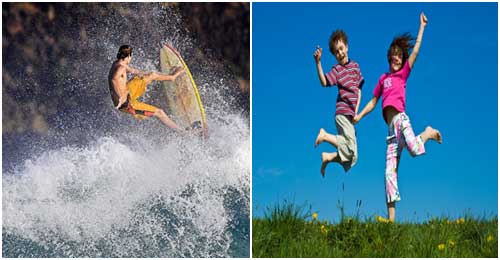 (i) Fast Shutter Speed: A fast shutter speed above 1/500sec (i.e. 1/1000sec, 1/2000sec, etc) is required when we want to freeze a moment. The shutter is open for a very less amount of time; therefore, it will register a moment which has happened in 1/500secs. But, this also means that it will allow the light to fall on sensor for only 1/500secs, which is very less. So, to get a well exposed image at this shutter speed, the available scene should be enough bright. Below are the two images representing the use of fast shutter speeds. Similarly, fast shutter speed would be needed in clicking birds in flight, a zipping train or aero plane, sports person playing in fields, etc. So, anything, which is moving very fast and we need to freeze the moment, we will use fast shutter speeds.
If there is a situation, where you want to use faster shutter speed, but the light is very less, then you have to either increase the aperture size or increase the ISO. However, both have limits. Higher ISO will even introduce lot of noise, which will make your image ineffective.
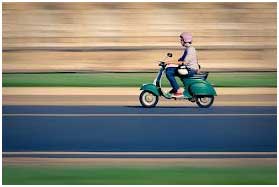
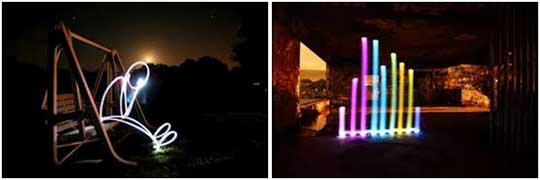
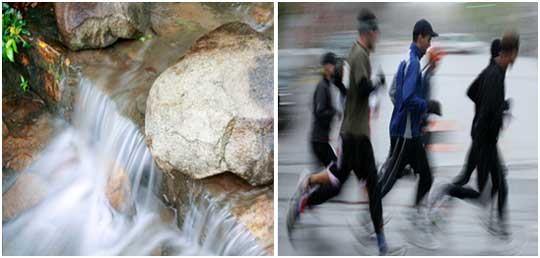 (ii) Slow Shutter Speed A slow shutter speed of 1/50sec and below (i.e. 1/40sec, 1/20sec, etc) can portray the moment or speed. The shutter opens for relatively more time; therefore, it can show the sense of movement. The images below show the results of slow shutter speeds.
A slow shutter speed will also help in providing correct exposure in relatively less light i.e. during morning, evening or inside home.
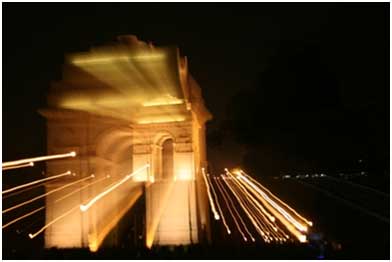
 (iii) Very slow shutter Speed: Very slow shutter speeds of 5 secs or slower are used in very low light situation and also to provide dramatic effect in the image. Very slow shutter speeds allow more time for camera to register the light, therefore, even in late evening to night situations, when the light levels are very low, camera will capture the image with correct exposure. Refer to the image below taken in very low light situation. Similarly, we can click city at night, star trails, lake side view at night, etc.
Remember that as we decrease the shutter speed, it will also start registering the movement of our hand. If the shutter speed is very low say below 0.5 or 1 sec, then it is difficult to get sharp pictures by holding camera in hand, as we cannot keep our hand stable for 1 sec. To overcome this, we need to use a fixed place (such as wall) or a tripod. The above picture is taken using a tripod. Without tripod, you cannot click such an image.
D-SLRs generally support only 30 sec of shutter speed. To further decrease the shutter speed, you need to select "bulb" mode, where you can keep the shutter open for any duration of time. This mode is available when you select the "Manual mode" in your equipment. Now, keep decreasing the shutter speed. After reaching 30sec, it will start showing "bulb". In this mode, the shutter will remain open as long as the shutter button is pressed. You will need a remote release to use it effectively.
Indian Institute of Photography | Copyright © 2025. All Rights Reserved