1. New photography tutorials and tips
2. Latest photography assignments
3. Photo competitions and prizes
Enter your email below to subscribe.
White Balance in photography is all about balancing colors so that the image contains the represents the actual combination of colors in the scene. But, why do we actually need it? It is because; your camera does not have enough intelligence to recognize correct color in different lighting conditions.
In layman terms, we define "what is white" for camera by inserting a reference image, which is perfectly white in color taken under white light (i.e. broad day sunlight). Camera will show all the colors correctly till we are shooting under the broad day sunlight. But, as soon as the lighting condition changes, for e.g. under "yellow bulb", camera cannot identify white, because it has a different reference image. Which means a perfectly white sheet under yellow bulb will look yellow in the image and not white.
To resolve this problem, we need to "Balance the White", i.e. tell our camera again, what is "white" in current lighting condition. This is called "White Balance". Once that is done, camera will again start showing all the colors correctly in that particular lighting condition.
The most important thing to remember is that we can easily manage "White Balance" in post editing. It is advisable to take the image in RAW format to get the maximum details. Any good post editing software can help you to change the White Balance and you can yourself define the correct color tones for the image.
This article will primarily help you in understanding the concept of WB, so that you can either manage it in post editing or even during the shoot.
Let us understand the concept further in technical terms.
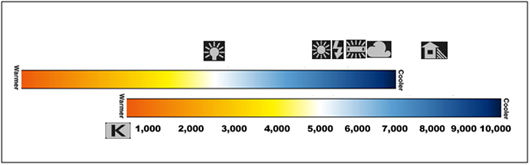
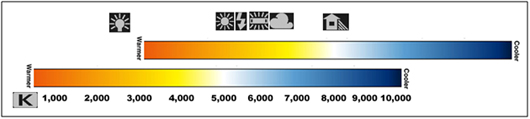
Every light source has its own color temperature measured in Kelvin from 1,000 K (candle light or warmer) to 10,000 K (evening shade or cooler). Our eye does not see this difference but the camera does, as it does not have any intelligence to identify that the lighting conditions has changed. When we adjust our white balance we are telling the camera what is supposed to be "White" in current lighting condition.
Please refer below to the Kelvin scale below.
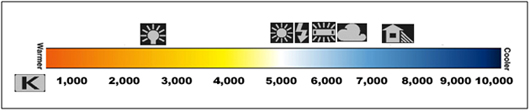
Sunlight is a pure white source and is right in the center of the Kelvin scale. Automatic White Balance (AWB) works best towards the center of the scale but fails as we reach the extremes.
If we set our camera's white balance to sunny (i.e. color temperature of around 5000K in the middle) and photograph an object under incandescent light (i.e. under the light source with color temperature of 2500K), the photograph will have a yellow cast (please refer to the image above). If we photograph an object in the shade (i.e. under the light source with color temperature of 7500K) it will have a blue cast (please refer to the image above).